![[icube banner]](../images/icube1.jpg)
EZReader
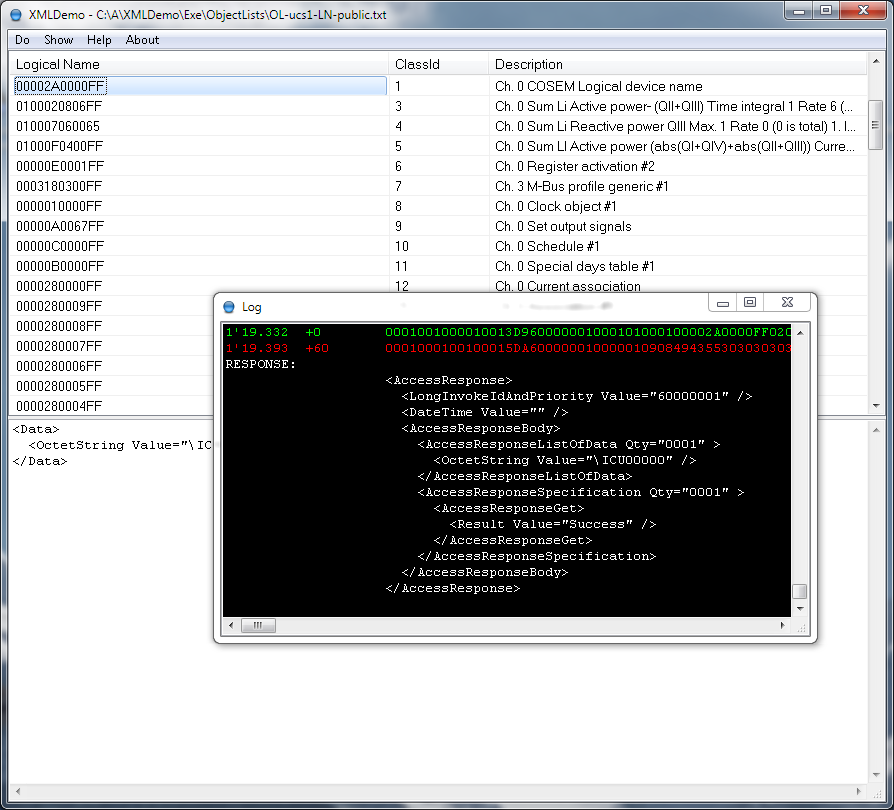
EZReader is a simple ''DLMS reader'' of values stored in a COSEM/DLMS meter. In the upper pane, it displays the ''objects'' hosted by the meter (COSEM instances), each with a logical name (OBIS code), class-id and description. The lower pane shows the values (when read) displayed in xml format. The log view shows the raw protocol data sent (green) and received (red) with the corresponding xml translation. EZReader supports both the TCP and the HDLC communication profiles. EZReader is build with the code of the COSEM/DLMS package components: xmlpdu for the xml presentation, ezhdlc for the HDLC profile and wrapper for the TCP profile.
If you are not familiar with DLMS/COSEM please read first our survival kit document.
Here is a short user's guide: Steps 1, 2 and 3 must be done once. Then, step 4 is the normal usage.
1 : Select ''Show/Settings...''
Select either the TCP profile or the HDLC profile. For the TCP profile, set the IP and Port of the meter, for example (IPv4) 192.168.10.12:4059 or (IPv6) [::1]:4059 For the HDLC profile, set a COM port, and (if needed) set a physical address, else let it blank. The details of the HDLC addressing are described here (see HDLC). In short: for 1 byte addressing, let the physical address blank; else set the required value. Check Mode E if required (mostly with optical probes), else (when the channel uses direct HDLC) set Baud. Set the Referencing model: LN or ''LN with ciphering'' for logical name referencing, supported by almost all meters or SN or ''SN with ciphering'' for short name referencing. Set the Auth.Mechanism. There are three different authentication mechanisms available with different authentication security levels. For a first try, set NO and skip directly to the Timeouts box below. Otherwise, if Auth.Mechanism is LOW, then set Low security PW, in hex. For example the ASCII PW ''ABCDEFGH'' must be set as 4142434445464748. If Auth.Mechanism is HIGH (GMAC) then set Encryption Key and Authentication key, both 16 octets, in hex, for example ''000102030405060708090A0B0C0D0E0F''. The values must (of course!) match those used by the meter. Set also the Meter system title, 8 octets, in hex, for example: 4943553030303030. Protection applied to request, set the minimum protection required, can be set to a higher protection than required In the Timeouts box, set Connect (decimal, in ms) to the maximum time allowed to ''connect'' to the meter (for example 2000, more for TCP). Set Response (decimal,in ms) to the maximum time allowed to receive a response to a request (for example 3000, more for TCP). In the Addresses box, the client address is the (kind of logical) address of the entity ''talking'' to the meter. According to the Standard, the value 16 (decimal) means public-client, equivalent to ''anybody''. The server address is the address of a logical device hosted by the meter. The Standard allows a device to host several logical devices, each with a different address. The Standard states that the device at address 1 (decimal) is the management logical device and is mandatory in each meter. Therefore, for a first try, set the client address to (decimal) 16, meaning that EZReader plays the role of a public-client and set the server to 1, meaning that we will ''talk'' to the (mandatory) management logical of the meter. Set also Auth.Mechanism to NO. Otherwise, set the ''real'' client and server addresses and also set the corresponding security elements. Let the Object-list file field blank and close the Settings dialog.2 : Select ''Show/Log...'' and then Select ''Do/Connect''
This opens the HDLC or the TCP connection and sends an
AssociationRequest to the meter and expects an AssociationResponse
indicating ''success''. Furthermore, if the Auth.Mechanism
is HIGH (GMAC) then it also performs the four-passes authentication. The log (Show/Log...) displays the details of the exchange. If the
association cannot be established, then an error message is
displayed. It is not possible to proceed until an association can be
established, i.e. the settings must be correct.
3 : Select "Do/Read object-list"
The upper pane is populated only when EZReader knows the objects available in the meter. The object-list must be read only once per association. When the object-list is read, a save dialog is opened that requires a file name to save the list to a file.
When the Object-list file is saved, then re-open the settings dialog and check that the Object-list file is correct, then click Save Settings... to save all these settings to a file.
Previously saved settings can be retrieved using Load Settings...
4 : Normal usage
On startup, EZReader automatically reloads the last settings and also the object-list file and then the object-list is shown in the upper pane.
Then, clicking (right or left) into the logical name column in the upper pane, displays a pop-up menu with the names of the attributes available in the selected instance. Clicking an attribute, reads it and displays its value in xml format into the lower pane.
The object-list can be sorted by clicking on the column headers.
Please note:
Don't hesitate to report any issue or suggestion to the e-mail address below.